Do All Outdoors FW60 Flyway 60 Clay Pigeon Throwers
Introduction
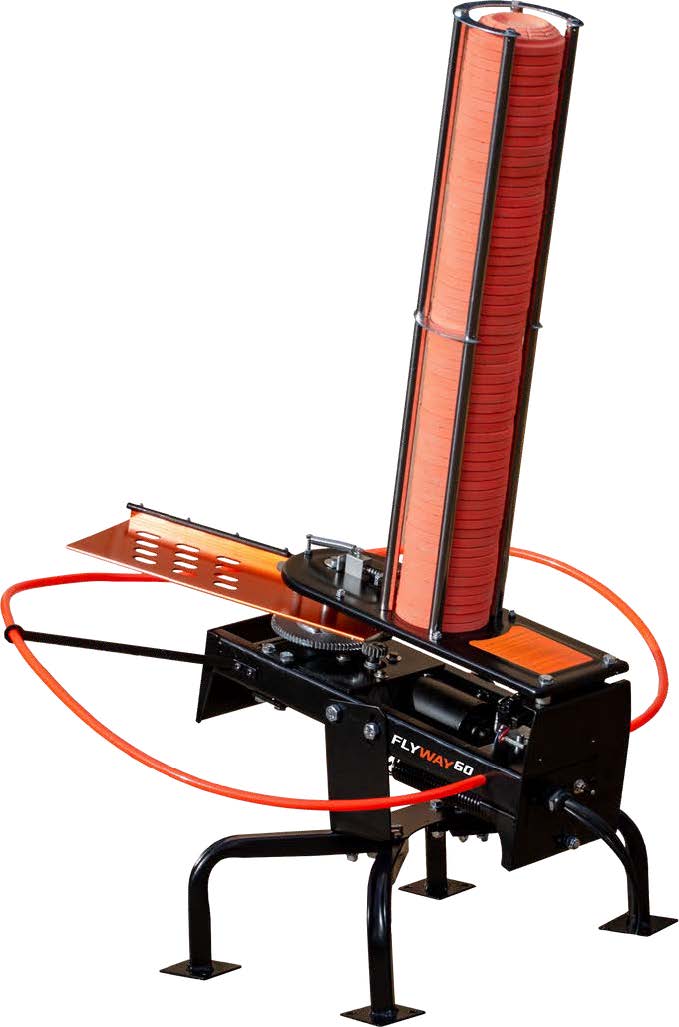
The high-performance manual clay pigeon thrower Do All Outdoors FW60 Flyway 60 is made for sport clay target practice, hunting, and shooting lovers. This trap thrower, which is made to last and be simple to operate, simulates realistic flight patterns for better shot accuracy with steady, smooth launches.
Specifications
- Model: FLYWAY 60
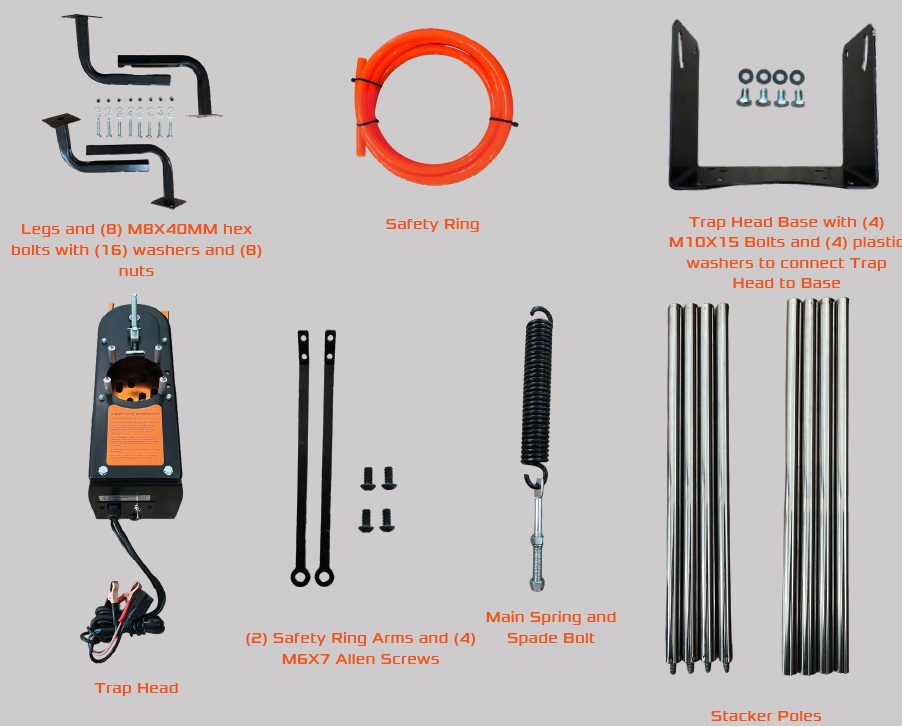
Included Parts
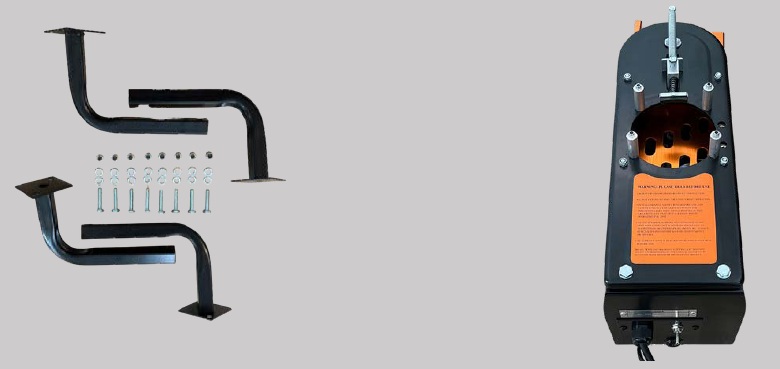
- Legs and (8) M8X40MM hex bolts with (16) washers and (8) nuts
- Safety Ring
- Trap Head Base with (4) M10X15 Bolts and (4) plastic washers to connect Trap Head to Base
- Trap Head
- Main Spring and (2) Safety Ring Arms and (4) Spade Bolt M6X7 Allen Screws
- Stacker Poles
- (2) Horseshoes and (4) 1/4 x 1/2 bolts
- Foot Pedal
- Wireless Remote
Product Usage Instructions
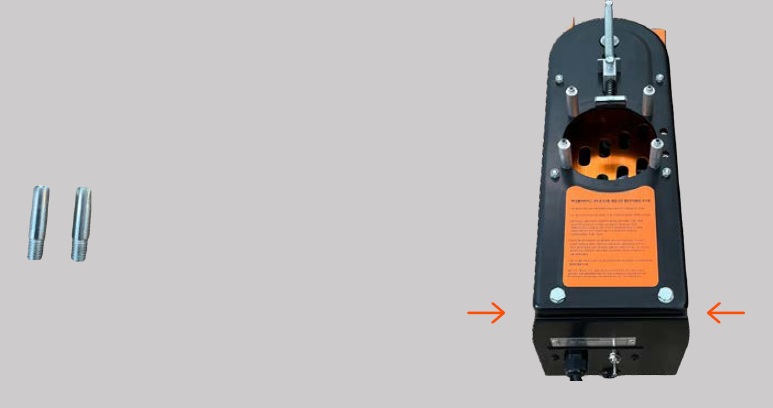
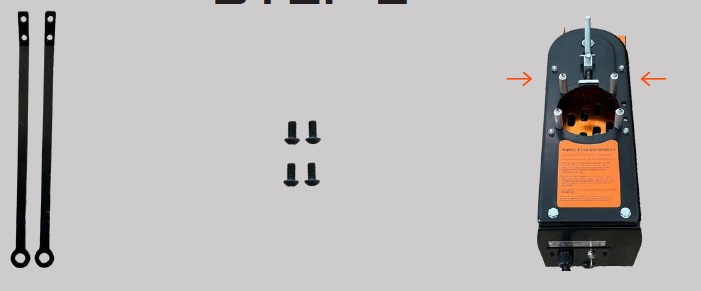
- Step 1: Safety Ring Installation
- Begin by flipping the Trap Head upside down. Thread in the studs for the safety ring on each side of the rear of the trap.
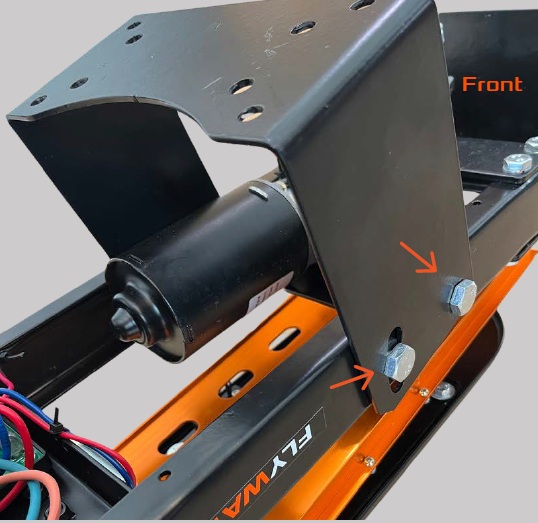
- Step 2: Front Leg Brackets and Safety Ring Arms
- Install the Front Leg Brackets and Safety Ring Arms using the provided allen head screws while the trap is still upside down.
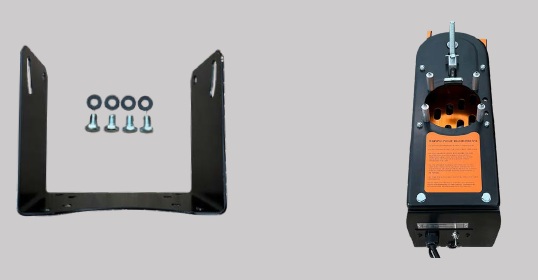
- Step 3: Trap Head Attachment
- Attach the Trap Head to the Trap Head Base using the provided bolts and plastic washers.
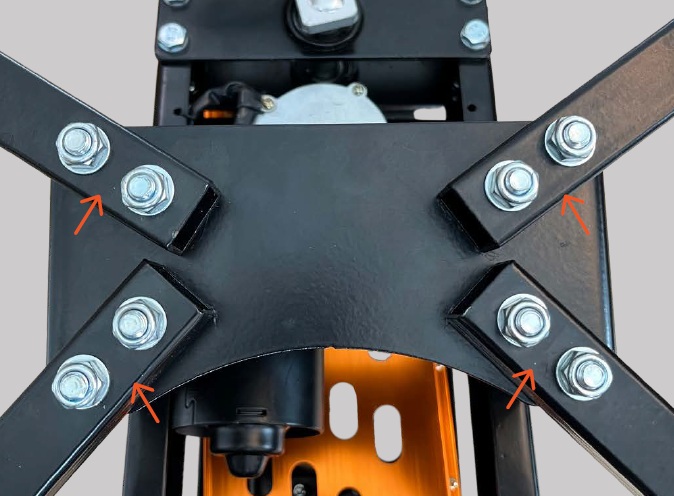
- Step 4: Legs Installation
- Install the Legs using the provided hex bolts, washers, and nuts while the trap is still upside down.
- Step: Safety Ring Connection
- Connect the Safety Ring through the Safety Ring arms to complete installation.
Operation
Ensure the deep cycle battery is fully charged before use.
- Connect foot pedal to the corded 3 prong plug coming out of the trap.
- Connect alligator clips to the battery posts following color coding.
- Operate the toggle switch on the trap as per instructions for loading clays.
- Exercise extreme caution when handling and storing the trap, especially when the main spring is installed.
INCLUDED PARTS
TOOLS NOT INCLUDED
- STEP 1
- Begin by flipping the Trap Head upside down. First, thread in the studs for the safety ring, which thread, by hand, from the outside in on each side of the rear of the trap, as shown above.
- STEP 2
- While the trap is still upside down, install the Front Leg Brackets and Safety Ring Arms (pointing forward, in the direction that the arm will throw the clays) using the (4) provided allen head screws. Secure the bolts with a 6mm alen wrench.
- STEP 3
- While the trap is still upside down, attach the Trap Head to the Trap Head Base using the (4) M10X15MM bolts and (4) plastic washers. (In order: Bolt, trap base, washer, trap head)
- STEP 4
- While the trap is still upside down, install the Legs using the (8) M8X40MM hex bolts with (16) washers and (8) nuts. Slide one washer on the bolt, then push the bolt through the trap base and the leg, secure with another washer, followed by a nut.
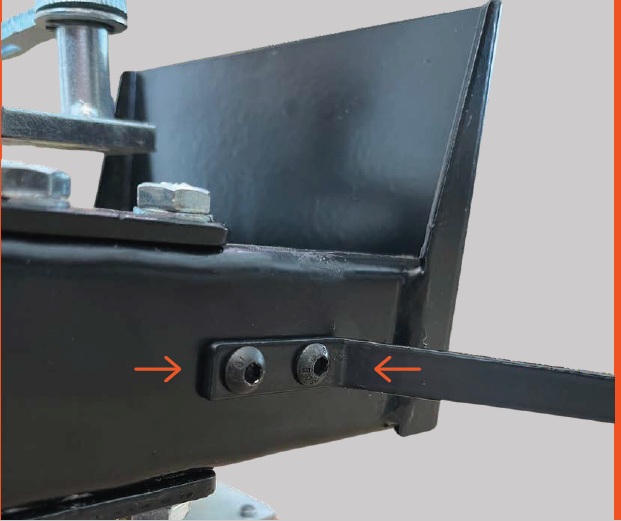
- STEP 5
- Now, rotate the throwing arm out to the 12 o’clock position as depicted above. Hook Main Spring onto the eyelet towards the front of the Trap Head. Remove the outer nut and slide the Spade Bolt through the hole in the rear of the trap. Then, secure the nut back onto the Spade Bolt. Tighten until 3-4 threads are exposed on the rear of the Spade Bolt. Use this as a starting point for your trap, tighten or loosen to desired tension after testing the trap’s throw once the remaining assembly is complete.
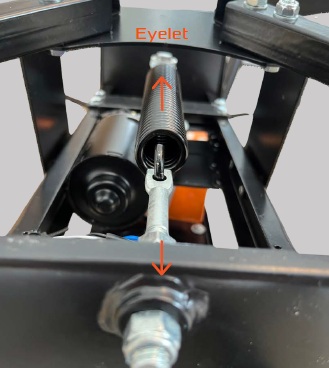
NOTE: Do not adjust interior nut on Spade Bolt, indicated by a black arrow above.
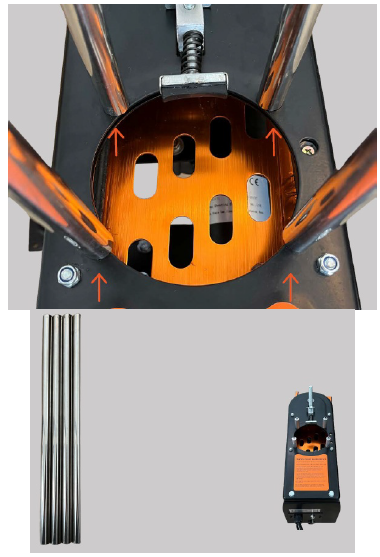
- STEP 6
- With the Trap now standing upright, remove the (4) rubber caps on top of the Trap Head, then slide each of the 4 Stacker Poles with female threads on one end and an opening on the other end onto the now exposed mounts.
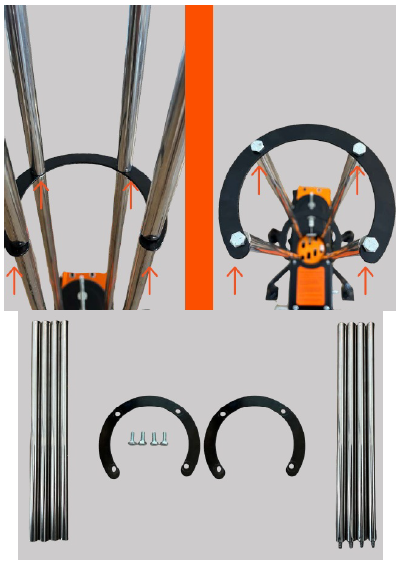
- STEP 7
- Place the first horseshoe with the opening facing the rear of the trap on top of the installed stacker poles. Thread the male end of the remaining 4 poles through the horseshoe into the long poles and tighten. Place the last horseshoe facing the rear of the trap on top of the pole setup and thread the 11MM screws through the horseshoe into the poles and tighten.
- STEP 8
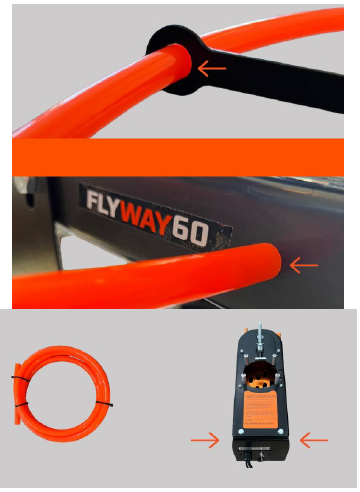
- Slide the Safety Ring through the Safety Ring arms and connect to each of the M8X10 Studs towards the rear of the Trap.
THANK YOU
ONCE THE MAIN SPRING IS INSTALLED, THE TRAP IS NOW LIVE AND CAN GO OFF IF LEFT IN THE COCKED POSITION. PLEASE USE EXTREME CAUTION AND ALWAYS REMOVE SPRING WHEN TRANSPORTING, ADJUSTING, OR STORING THE TRAP.
Operation
- Make sure deep cycle battery (not included) is fully charged. Before clamping trap alligator clips to battery, make sure the toggle switch on the trap is set to off. **NEVER CARRY TRAP BY THROWING ARM – THIS CAN BEND AND AFFECT PERFORMANCE!
- Connect foot pedal to the corded 3 prong plug coming out of the trap. **NEVER PLUG THIS INTO A WALL.
- Connect red alligator clip to the positive battery post and the black alligator clip to the negative battery post.
- Flip the toggle switch on the trap up to “disarm.” Once arm moves to 12 o’clock position, turn the machine back off and load STANDARD SIZE CLAYS ONLY into the stacker tube assembly. Once the trap is loaded, you can flip the toggle switch down to “on.” The arm will rotate counter-clockwise and automatically load a clay onto the throwing arm. THE TRAP IS NOW COCKED. PLEASE USE EXTREME CAUTION.
- ALWAYS set trap up pointing away from bystanders, trees, and animals with a recommended 400 meter open field/shot fall zone. Always look over the trap for damage and test throw a few clay pigeons before use to make sure the trap is operating properly. NEVER ADJUST TRAP WHEN COCKED AND IN FIRING POSITION!!!
- With the shooter/bystanders standing to the left or behind the trap, press the foot pedal to throw the clay!
- When you are done shooting, switch the toggle switch to disarm, hold the foot pedal down until the throwing arm reaches 12 o’clock, and turn the toggle switch to off. The trap is now safe to unload/move.
Troubleshooting
ALWAYS REMOVE MAIN SPRING PRIOR TO TROUBLESHOOTING MACHINE NOT TURNING ON
- CHECK BATTERY CONNECTION. THE MACHINE DRAWS 16 AMPS TO WORK PROPERLY. WE RECOMMEND A DEEP CYCLE BATTERY WITH A MINIMUM OF 675 COLD CRANKING AMPS.
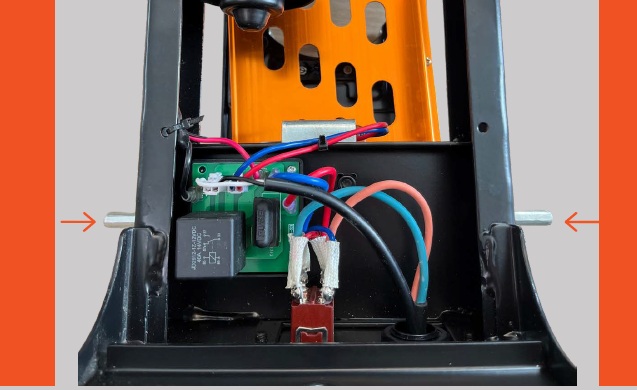
- CHECK THE 15A AUTOMOTIVE BLADE FUSE IN THE REAR OF THE TRAP HEAD.
REMOVE THE COVER AND PULL THE FUSE OUT TO INSPECT. REPLACE AS NEEDED. SEE FIGURE 1 ON THE NEXT PAGE. - CHECK RELAY. PLEASE EMAIL OR CALL CUSTOMER SERVICE IF ISSUES CONTINUE.
AUTO FIRING/NOT FIRING
- IF THE TRAP CONTINUES TO FIRE, UNPLUG THE FOOT PEDAL. IF IT STOPS, THE SCREWS ON THE FOOT PEDAL NEED TO BE LOOSENED TO DEPRESS THE PEDAL DURING OPERATION.
- IF FOOT PEDAL ISSUES CONTINUE, PLEASE SEE OUR TROUBLESHOOTING PAGE ON OUR WEBSITE FOR TESTING YOUR FOOT PEDAL.
- ONCE YOU HAVE ESTABLISHED YOUR FOOT PEDAL IS NOT THE ISSUE, MOVE ON TO THE LIMIT SWITCH. SEE FIGURE 2 ON THE NEXT PAGE FOR LOCATION. IF YOUR TRAP CONTINUES TO AUTO FIRE, USE A 2.5MM ALLEN WRENCH TO LOOSEN THE ALLEN SCREW AND ADJUST THE LIMIT SWITCH UP SO THE ARM WILL TRIGGER THE LIMIT SWITCH EARLIER TO STOP THE ARM FROM CONTINUOUS FIRING
- IF THE TRAP WILL NOT FIRE AND COINCIDES WITH THE LIMIT SWITCH, THIS MEANS THE ARM IS STOPPING TOO SOON. THE LIMIT SWITCH NEEDS TO BE ADJUSTED DOWN AND THEN RECHECKED TO ENSURE PROPER FIRING
- A GOOD RULE OF THUMB FOR ARM PLACEMENT WHEN LOADED IS TO MAKE SURE THE CLAY LOADS BETWEEN 1/2 AND 1 INCH FROM THE RUBBER STRIP. IF IT’S FARTHER, THE ARM IS STOPPING TOO SOON.
BREAKING CLAY PIGEONS
- MAKE SURE THE STACKER TUBE HORSESHOE OPENING IS FACING THE REAR OF THE TRAP. IF IT IS FACING FORWARD, REMOVE THE CLAYS AND TURN IT AROUND SO THE OPENING FACES THE BACK OF TRAP AND THE ARM SHOULD ALWAYS BE IN THE 12 O’CLOCK POSITION WHEN LOADING CLAY PIGEONS.
- IF TRAP IS “JUMPING” AROUND WHEN THE ARM SWINGS, THIS COULD BREAK CLAYS IN THE STACK OR WHILE LOADING ONTO ARM. THE TRAP SHOULD BE SECURED USING STAKES (NOT INCLUDED) OR BY MOUNTING TO A BOARD OR PIECE OF PLYWOOD FOR STABILITY.
- SOMETIMES WHEN THE STACK IS DOWN TO A FEW CLAYS, THE MOTION OF THE TRAP CAN THROW THE CLAY PIGEONS AROUND AND THEY BREAK. ONCE YOU GET DOWN TO 2-3 CLAYS LEFT, ADD MORE TO WEIGH DOWN THE STACK AND CONTINUE SHOOTING!
- CHECK TO SEE WHERE THE BASE OF FEEDER BRUSHES ARE TO THE TOP OF THE CLAY THE MOUNTING HARDWARE SHOULD NEVER TOUCH THE TOP OF THE BIRD. IF THIS IS HAPPENING, THE ARM OR CHASSIS IS BENT
OTHER
- IF THE CLAY IS FLYING WITH A WOBBLE, THE THROWING ARM IS BENT AND WILL NEED TO BE BENT BACK OR REPLACED. NEVER CARRY THE TRAP BY THE ARM.
- IF THE MAIN GEAR AND MOTOR ARE MOVING BUT THE THROWING ARM ISN’T THEN THERE MAY BE AN ISSUE WITH THE CLUTCH ASSEMBLY. PLEASE REFER TO THE CLUTCH TEST INSTRUCTIONS ON THE TROUBLESHOOTING PAGE ON OUR WEBSITE.
- ALWAYS CHECK THE GREASE ON MAIN GEAR & MOTOR SPROCKET. ADD SILICONE GREASE WHEN NECESSARY TO KEEP GEARS IN PROPER WORKING ORDER
Warranty
Warranty & Customer Service
Register your product online at www.doalloutdoors.com Receipt is required for warranty registration. ONE YEAR PARTS WARRANTY.
DO-ALL OUTDOORS LLC
1(866)SHOT-DOC Monday – Friday 8:00 AM to 4:00 PM customerservice@doalloutdoors.com Nashville, Tennessee, USA
Find tech tips, instructions, troubleshooting videos, and more online at doalloutdoors.com
Do All Outdoors FW60 Flyway 60 Clay Pigeon Throwers Instruction Manuals
FAQ
How does the FW60 Flyway 60 clay pigeon thrower work?
The FW60 operates by loading a clay pigeon into the thrower, then pulling a release mechanism which launches the target into the air, simulating the flight of a bird for shooting practice.
What types of clay targets are compatible with the FW60?
The FW60 Flyway 60 is compatible with standard 108mm clay targets commonly used in clay pigeon shooting sports. preferences.
Is the FW60 Flyway 60 suitable for beginners?
Yes, the FW60 is user-friendly and suitable for shooters of all skill levels, including beginners. Its adjustable settings allow for customization to match individual skill levels and
Is the FW60 Flyway 60 portable and easy to set up?
Yes, the FW60 is designed to be portable and easy to set up, making it ideal for use at shooting ranges, hunting camps, or backyard shooting sessions.
What power source does the FW60 Flyway 60 require?
The FW60 operates using a standard 12-volt battery, providing reliable power for extended shooting sessions without the need for electrical outlets.