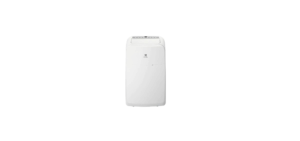
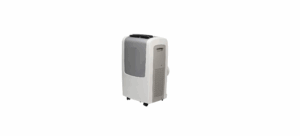
Electrolux Frigidaire Portable Air Conditioner
Introduction
A flexible and effective cooling option for homes, workplaces, and small areas is the Electrolux Frigidaire Portable Air Conditioner. Without requiring permanent installation, this machine offers rapid and energy-efficient temperature management with its substantial cooling capacity, several operating modes, and ease of mobility.
Important Safety Instructions
NOTE:
This USE & CARE MANUAL provides specific operating instructions for your model. Use the room air conditioner only as instructed in this USE & CARE MANUAL. These instructions are not meant to cover every possible condition and situation that may occur. Common sense and caution must be practiced when installing, operating, and maintaining any appliance.
WARNING
Avoid fire hazards or electric shock. Do not use an extension cord or an adaptor plug. Do not remove any prong from the power cord.
For Your Safety
Do not store or use gasoline or other flammable vapors and liquids in the vicinity of this or any other appliance. Read product labels for flammability and other warnings.
Prevent Accidents
To reduce the risk of fire, electrical shock, or injury to persons when using your air conditioner, follow basic precautions, including the following:
- Be sure the electrical service is adequate for the model you have chosen. This information can be found on the serial plate, which is located on the side of the cabinet.
- If the air conditioner is to be installed in a window, you will probably want to clean both sides of the glass first.
- Be sure the air conditioner has been securely and correctly installed according to the installation instructions in this manual. Save this manual for possible future use in removing or reinstalling this unit.
Electrical Information
The complete electrical rating of your new portable air conditioner is stated on the serial plate. Refer to the rating when checking the electrical requirements.
- Be sure the air conditioner is properly grounded. To minimize shock and fire hazards, proper grounding is important. The power cord is equipped with a three-prong grounding plug for protection against shock hazards.
- Your air conditioner must be used in a properly grounded wall receptacle. If the wall receptacle you intend to use is not adequately grounded or protected by a time delay fuse or circuit breaker, have a qualified electrician install the proper receptacle.
- Do not run the air conditioner without an outside protective cover in place. This could result in mechanical damage to the air conditioner.
- Do not use an extension cord or an adapter plug.
SAFETY PRECAUTIONS
DANGER! Avoid Serious Injury or Death
- This air conditioner contains no user-serviceable parts. Always call an authorized Electrolux servicer for repairs.
- Do not insert or place fingers or objects into the air discharge area on top of the unit.
- Do not start or stop the air conditioner by unplugging the power cord or turning off the power at the electrical box.
- Do not cut or damage the power cord.
- If the power cord is damaged, it should only be replaced by an authorized Electrolux servicer.
- In the event of a malfunction (sparks, burning smell, etc.), immediately stop the operation, disconnect the power cord, and call an authorized
- Electrolux servicer.
- Do not operate the air conditioner with wet hands.
- Do not pull on the power cord.
- Do not drink any water that is drained from the air conditioner
READ THIS SECTION BEFORE ATTEMPTING TO OPERATE AIR CONDITIONER.
The unit must be upright for one hour before operating.
The power supply cord contains a current device that senses damage to the power cord. To test your power supply cord do the following:

- Plug in the Air Conditioner.
- The power supply cord will have TWO buttons on the plug head. Press the TEST button. You will
notice a click as the RESET button pops out. - Press the RESET button. Again you will notice a click as the button engages.
- The power supply cord is now supplying electricity to the unit. (On some products this is also indicated by a light on the plug head).
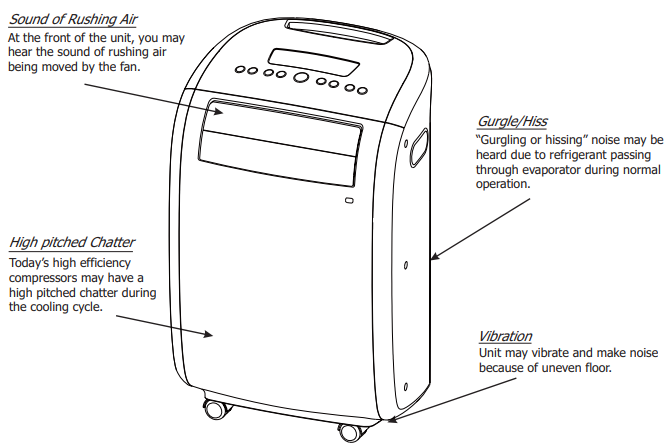
Normal Sounds
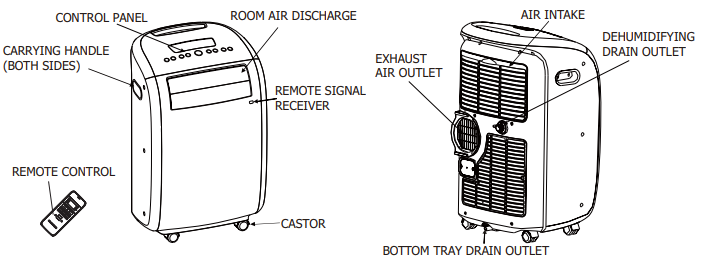
Unit Description
Accessories Included
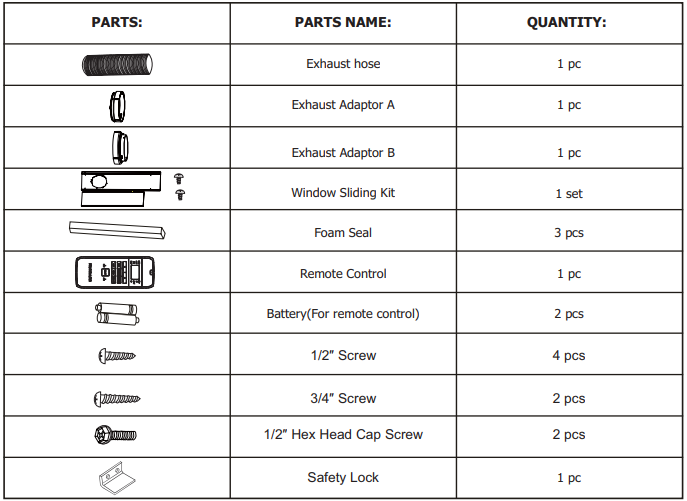
- Check all the accessories are included in the package and please refer to the installation instructions for their usage.
Installation Instructions
EXHAUSTING HOT AIR
In the COOLING Mode, the appliance must be placed close to a window or opening so that the warm exhaust air can be ducted outside. First position the unit on a flat floor and make sure there’s a minimum of 12″ clearance around the unit, and is within the vicinity of a single circuit outlet power source.
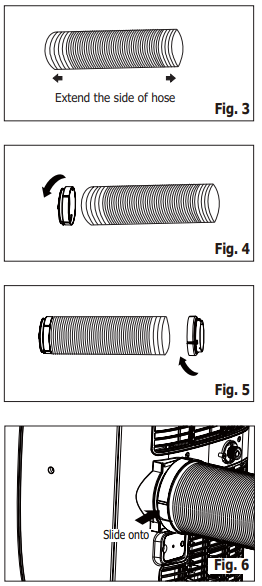
- Extend either side of the hose (Fig. 3) and screw the hose to adaptor A (Fig. 4).
- Extend the other side of the hose and screw it to adaptor B (Fig. 5).
- Slide the assembly onto the unit (Fig. 6).
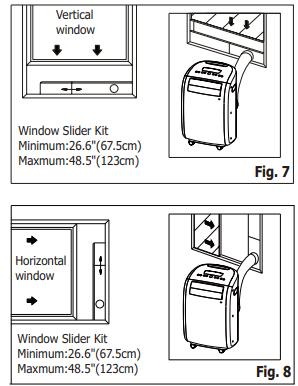
- Affix the adaptor B into the window slider kit and seal. (Fig. 7&8)
The hose can be extended from its original length of 15″ up to 55″, but it is best to keep the length to the minimum required. Also, make sure that the hose does not have any sharp bends or sags. (Fig. 9).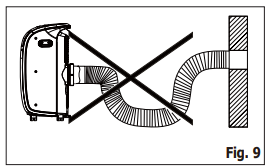
Installation in a double-hung sash window
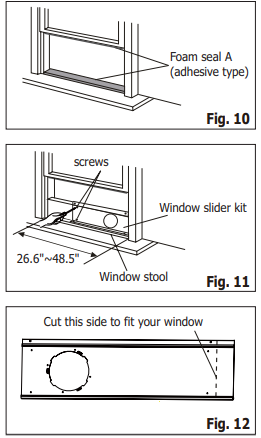
- Cut the foam seals(adhesive type) to the proper lengths and attach them to the window and stool. (Fig. 10).
- Open the window sash and place the window slider kit on the window stool (Fig. 11). Attach the window slider kit to the window stool. Adjust the length of the window slider kit according to the width of the window. Screw down the two screws on the window slider kit. See Fig.11. Cut the adjustable window slider kit if the width of the window is less than 26.6 inches (Fig. 12).
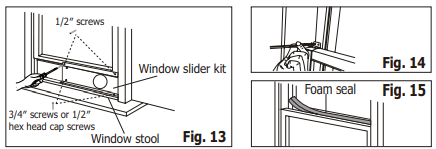
- Close the window sash securely against the window slider kit. (Fig. 13)
- Drive two 1/2″ screws to secure the window slider kit to the window sash. (FIG. 13)
- Secure the window slider kit to the window stool (FIG. 13):
- For wooden windows: Use 3/4″ screws for securing.
- For Vinyl-Clad windows: for securing.
- To secure the lower sash in place, attach the right angle sash lock with a 1/2 ( 12.7mm) screw as shown (fig.14).
- Cut the foam seal to an appropriate length and seal the open gap between the top window sash and the outer window sash, as shown in Fig.15.
Installation in a sliding sash window
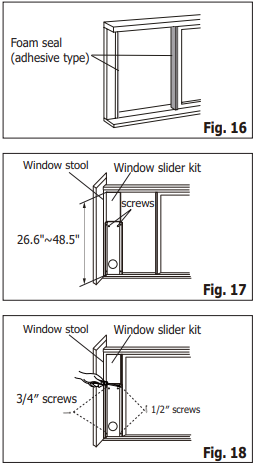
- Cut the foam seals(adhesive type) to the proper lengths and attach them to the window frame. See Fig.16.
- Open the window sash and place the window slider kit on the window stool. See Fig.17. Attach the window slider kit to the window stool. Adjust the length of the window slider kit according to the height of the window. Screw down the two screws on the window slider kit. See Fig.17. Cut the adjustable window slider kit if the height of the window is less than 26.6 inches (Fig. 12).
- Close the sliding sash securely against the window slider kit. (Fig. 18)
- Drive two 1/2″ screws to secure the window slider kit to the window sash. (Fig. 18)
- Drive two 3/4″ screws to secure the window slider kit to the window stool. (Fig. 18)
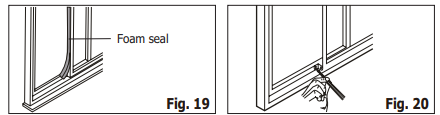
- Cut the foam seal to an appropriate length and seal the open gap between the sliding sash and outer window sash, as shown in Fig.19
- To secure the sliding sash in place, attach the right angle sash lock with a 1/2″ (12.7mm) screw as shown. (Fig.20)
Air Conditioner Features
CONTROL PANEL
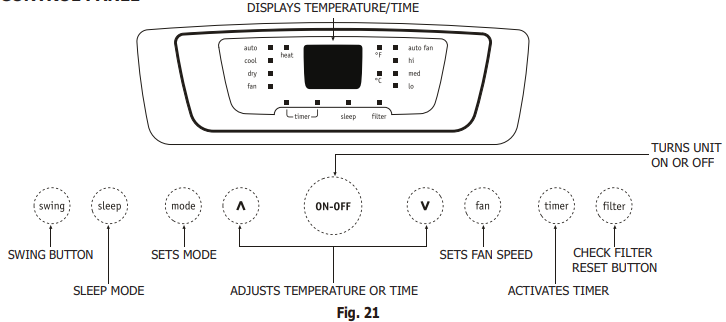
REMOTE CONTROL
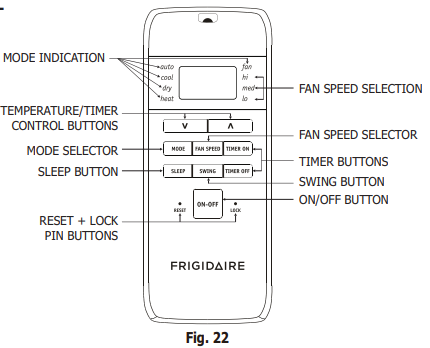
Operating Instructions
NOTE
The following instructions represent the Control Panel, the same instructions can be used for the Remote Control.
In this mode, the exhaust adaptor hose MUST be used.
- Press the MODE button until the “Cool” indicator lights.
- Press the ” ” Temp buttons for the desired setting.
- Press the FAN button for the desired fan speed.
In this mode, you do not need to use the exhaust adaptor hose.
- Press the MODE button until the “Heat” indicator lights.
- Press the ” ” Temp buttons for the desired heat setting.
In this mode, you do not need to use the exhaust adaptor hose, BUT the water collected must be discharged. See Drainage Section.
- Press the MODE button until the “Dry” indicator lights.
- The fan will run at low speed and the display will show the room temperature.
- Keep doors & windows closed for best effect.
Always have the exhaust hose attached in this mode.
When you set the air conditioner in AUTO mode, it will automatically select cooling, heating(inapplicable for cooling-only models), or fan-only operation depending on what temperature you have selected and the room temperature. The air conditioner will control room temperature automatically around the temperature point set by you. Under AUTO mode, you can not select the fan speed.
FAULT CODE
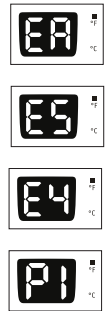
- If the display reads “EA”, the room temperature sensor has failed. Contact your Authorized Frigidaire Service Center.
- If the display reads “ES”, the evaporator temperature sensor has failed. Contact your Authorized Frigidaire Service Center.
- If the display reads “E4”, the display panel communication has failed. Contact your Authorized Frigidaire Service Center.
- If the display reads “P1”, the bottom tray is full. Carefully move the unit to a drain location, remove the bottom drain plug, and let the water drain away. Restart the machine until the “P1” symbol disappears. If the error repeats, call for service.
DRAINAGE
During the dehumidifying mode, you will need a garden hose (sold separately) to drain the condensate from the unit. Remove the rubber stopper from the hose connector, then screw on a garden hose to the connector as shown in Fig 23. The hose may then: A. Discharge into a drain that is lower than the unit. B. Be connected to a condensate pump (sold separately).
CARE & CLEANING
Clean your air conditioner occasionally to keep it looking new. Be sure to unplug the unit before cleaning to prevent shock or fire hazards.
Air Filter Cleaning
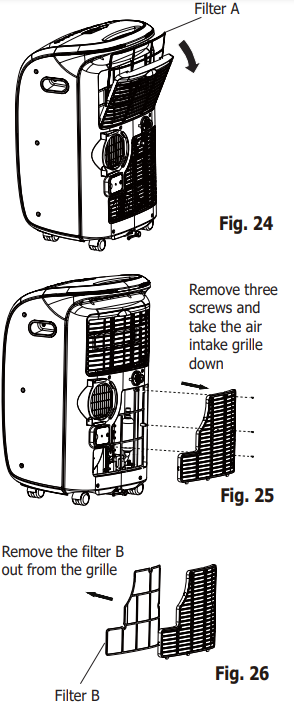
- This unit has two filters, they are filter A and B. Grasp the upper panel tab and take off filter A which behind the grill of the back panel (Fig.24). Remove the lower filter B by loosening the screws. Take down the air inlet grille, then remove the air filter as shown in Fig.25 & 26. Air Filter Cleaning
- Wash the filter using liquid dishwashing detergent and warm water. Rinse the filter thoroughly. Gently shake excess water from the filter. Be sure the filter is thoroughly dry before replacing.
- Or, instead of washing you may vacuum the filter clean.
Cabinet Cleaning
- Be sure to unplug the air conditioner to prevent shock or fire hazards. The cabinet and front may be dusted with an oil-free cloth or washed with a cloth dampened in a solution of warm water and mild liquid dishwashing detergent. Rinse thoroughly and wipe dry. Cabinet Cleaning
- Never use harsh cleaners, wax, or polish on the cabinet front.
- Be sure to wring excess water from the cloth before wiping around the controls.
- Excess water in or around the controls may cause damage to the air conditioner.
Winter Storage
If you plan to store the appliance during the winter, cover it with plastic or return it to its carton.
Before You Call
Before calling for service, review this list. It may save you time and expense. This list includes common occurrences that are not the result of defective workmanship or materials in this appliance.
If These Solutions Fail, Call 1-800-944-9044 For Frigidaire Service.
Major Appliance Warranty
Your appliance is covered by a limited one-year warranty and a limited 2-5-year warranty on the sealed system (the compressor, condenser, evaporator, and tubing). For one year from your original date of purchase, Electrolux will pay all costs for repairing or replacing any parts of this appliance that prove to be defective in materials or workmanship when such appliance is installed, used, and maintained by the provided instructions. From the second to the fifth year from your original purchase date, Electrolux will repair or replace any parts in the Sealed Refrigeration System (compressor, condenser, evaporator, and tubing) that prove to be defective in materials or workmanship.
Exclusions
This warranty does not cover the following:
- Product that has been transferred from its original owner to another party or removed outside the USA or Canada.
- Rust on the interior or exterior of the unit.
- Products purchased “as-is” are not covered by this warranty.
- Food loss due to any refrigerator or freezer failures.
- Products used in a commercial setting.
- Service calls that do not involve malfunction or defects in materials or workmanship, or for appliances not in ordinary household use or used other than by the provided instructions.
- Service calls to correct the installation of your appliance or to instruct you how to use your appliance.
- Expenses for making the appliance accessible for servicing, such as removal of trim, cupboards, shelves, etc., which are not a part of the appliance when it is shipped from the factory.
- Service calls to repair or replace appliance light bulbs, air filters, water filters, other consumables, knobs, handles, or other cosmetic parts.
- Surcharges include, but are not limited to, any after-hour, weekend, or holiday service calls, tolls, ferry trip charges, or mileage expenses for service calls to remote areas, including the state of Alaska.
- Damages to the finish of appliance or home incurred during installation, including but not limited to floors, cabinets, walls, etc.
- Damages caused by: services performed by unauthorized service companies; use of parts other than genuine Electrolux parts or parts obtained from persons other than authorized service companies; or external causes such as abuse, misuse, inadequate power supply, accidents, fires, or acts of God.
If You Need Service
Keep your receipt, delivery slip, or some other appropriate payment record to establish the warranty period should service be required. If service is performed, it is in your best interest to obtain and keep all receipts. Service under this warranty must be obtained by contacting Electrolux at the addresses or phone numbers below. This warranty only applies in the USA and Canada. In the USA, your appliance is warranted by Electrolux Major Appliances North America, a division of Electrolux Home Products, Inc. In Canada, your appliance is warranted by Electrolux Canada Corp. Electrolux authorizes no person to change or add to any obligations under this warranty. Obligations for service and parts under this warranty must be performed by Electrolux or an authorized service company. Product features or specifications as described or illustrated are subject to change without notice.
USA
- 1.800.944.9044
- Electrolux Major Appliances
- North America
- P.O. Box 212378
- Augusta, GA 30907
Canada
- 1.800.265.8352
- Electrolux Canada Corp.
- 5855 Terry Fox Way
- Mississauga, Ontario, Canada
- L5V 3E4
- www.frigidaire.com USA 1-800-944-9044
- www.frigidaire.ca Canada 1-800-265-8352
The multinational appliance producer Electrolux, which has been in business for almost a century, is the owner of Frigidaire. There are several different types of household appliances in the Frigidaire product lineup. Frigidaire produces ranges, stoves, wall ovens, microwaves, dishwashers, and cooktops for use in kitchens.
Electrolux Frigidaire Portable Air Conditioner User Manual
FAQs
How big of a space can this portable air conditioner cool?
Depending on the model, it can efficiently chill spaces up to 450 square feet (check the BTU rating; it’s usually between 8,000 and 14,000 BTU).
Is a window necessary for installation?
Yes, a sliding or double-hung window is required in order to use the window system and exhaust pipe that come with it to vent hot air outdoors.
Is it suitable for dehumidification?
Indeed! Great for humid locations, it includes a dedicated dehumidifier mode that eliminates moisture without cooling.
How frequently should the filter be cleaned?
For best results, the washable filter should be cleaned every two to four weeks.
Does condensation require a drain?
The majority of models do not require manual drainage because they use auto-evaporation. Draining may occasionally be necessary in regions with excessive humidity.