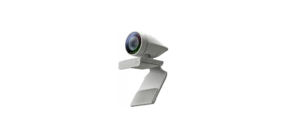
Poly G7500 Ultra HD Smart Video conferencing Camera
Introduction
A state-of-the-art video conferencing tool for contemporary meeting rooms and collaborative areas is the Poly G7500 Ultra HD Smart Video Conferencing Camera. It offers remarkable 4K Ultra HD video quality, cutting-edge AI-powered capabilities, and smooth interaction with well-known video conferencing apps like Google Meet, Zoom, and Microsoft Teams. The G7500 guarantees engaging and expert video conferencing thanks to its broad field of view, clever framing, and excellent audio-visual synchronization. It’s a great option for companies trying to improve communication and collaboration from a distance.
Audience, Purpose, and Required Skills
This guide is intended for beginning users, as well as intermediate and advanced users, who want to learn more about the features available with the system.
Related Poly and Partner Resources
See the following sites for information related to this product.
- The Poly Online Support Center is the entry point to online product, service, and solution support information including Video Tutorials, Documents & Software, Knowledge Base, Community Discussions, Poly University, and additional services.
- The Poly Document Library provides support documentation for active products, services, and solutions. The documentation displays in responsive HTML5 format so that you can easily access and view installation, configuration, or administration content from any online device.
- The Poly Community provides access to the latest developer and support information. Create an account to access Poly support personnel and participate in developer and support forums. You can find the latest information on hardware, software, and partner solutions topics, share ideas, and solve problems with your colleagues.
- The Poly Partner Network is a program where resellers, distributors, solutions providers, and unified communications providers deliver high-value business solutions that meet critical customer needs, making it easy for you to communicate face-to-face using the applications and devices you use every day.
- The Poly Services help your business succeed and get the most out of your investment through the benefits of collaboration.
Poly Partner Mode Overview
Poly Partner Mode allows you to run third-party conferencing applications on supported Poly video systems. For example, after powering on your system for the first time, you can select Zoom Rooms to place Zoom calls.
Refer to the supported partner documentation for information on using third-party applications:
- Zoom Rooms: https://support.zoom.us/hc/en-us
- Microsoft Teams Rooms: https://support.office.com/en-us/teams
- GoToRoom by LogMeIn: https://support.goto.com/products
- StarLeaf: https://support.starleaf.com/
- RingCentral Rooms (RCV Rooms): https://support.ringcentral.com/
- Dialpad: https://help.dialpad.com/
- BlueJeans Rooms by Verizon: https://support.bluejeans.com/s/
Product Overview of Poly Video Systems
Poly G7500, Studio X70, Studio X50, and Studio X30 systems in Partner Mode can seamlessly join meetings using third-party conferencing applications.
Note: Exact features and capabilities can vary between partner applications. See the application’s documentation for information.
Poly G7500 System Features and Capabilities G7500 systems support the following features:
- Peripheral cameras and microphones make the system scalable for medium rooms and up to large integrated rooms
- Placing and joining video calls
- Sharing wireless and wired content
- Camera tracking technology that can automatically zoom in on the person talking or frame the group of people in the room (depending on the paired camera and system configuration)
- Poly NoiseBlockAI, which eliminates background and extraneous sound during calls in common working environments
- Polycom Acoustic Fence technology, which enables video conferencing in open workspaces by capturing only the voices in a defined area
- HDMI: Single input and dual output
- Using a wired or wireless USB mouse as an input device
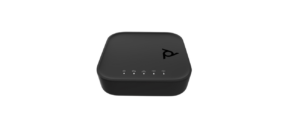
Poly G7500 Hardware
The following figure displays the hardware features on the Poly G7500 system. The table lists each feature numbered in the figure.

Poly G7500 Feature Descriptions
| Ref. Number | Feature | Feature Description |
| 1 | Reset button | Resets the Poly G7500 to the factory software version |
| 2 | LED indicator | Indicates the system status |
| 3 | Remote control pairing button | Enables the Bluetooth remote control pairing mode |
| 4 | Restart button | Restarts your system |
LED Status Indicators
The following figures display the LEDs on your systems. The tables list each LED indicator and its associated status.
LED Status Indicators for the G7500 System
Use the LED on the front right corner of the codec to get information on the state of your system.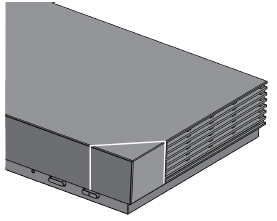
G7500 System LED Status Indicators
| Indicator | Status |
| Blinking white | Powering on |
| Solid white | Working normally |
| Indicator | Status |
| Solid green | In a call |
| Blinking amber | Update in progress |
| Solid amber | Sleeping |
| Blinking red | Error preventing normal operation |
| Solid red | Muted microphone |
Powering the System On and Off
The system turns on when you plug it into a power source. The system doesn’t have a power button, so you must unplug the power cable to power it off.
Wake the System
After a period of no activity, the system enters sleep mode (if configured by your administrator). You can wake it using a touch monitor or Poly TC8.
Procedure
Do one of the following:
- If you’re using a touch monitor, tap the primary screen.
- If you’re using the TC8, tap the screen.
- If you’re using a Poly Trio, tap the screen.
Accessibility Features
Poly products include a number of features to accommodate users with disabilities.
Users Who Are Deaf or Hard of Hearing
Your system includes accessibility features for users who are deaf or hard of hearing to use the system. The following table lists the accessibility features for users who are deaf or hard of hearing.
Accessibility Features for Users Who Are Deaf or Hard of Hearing
| Accessibility Feature | Description |
| Visual notifications | Status and icon indicators let you know when you have incoming, outgoing, active, or held calls. Indicators also alert you of the device’s status and when features are enabled. |
| Status indicator lights | The system and its microphones use LEDs to indicate some statuses, including if your microphones are muted. |
| Adjustable call volume | While in a call, you can raise or lower the volume of the device. |
Users Who Are Blind, Have Low Vision, or Have Limited Vision
Your system includes accessibility features for users who are blind, have low vision, or have limited vision to use the system.
The following table lists the accessibility features for users who are blind, have low vision, or have limited vision.
Accessibility Features for Users Who Are Blind, Have Low Vision, or Have Limited Vision
| Accessibility Feature | Description |
| Auto-answering | You can enable the phone to auto-answer calls. |
| Ringtones | An audible tone plays for incoming calls. |
| Join and leave tones | The system plays a tone when someone joins or leaves a conference call. |
Users with Limited Mobility
Your system includes accessibility features to enable users with limited mobility to use various system features. The following table lists the accessibility features for users with limited mobility.
Accessibility Features for Users with Limited Mobility
| Accessibility Feature | Description |
| Poly TC8 | The TC8 enables you to control the system and to perform tasks such as placing calls. |
| Auto-answering | You can enable the system to auto-answer calls. |
| Calling from a personal device | With administrator credentials, you can wirelessly access the system web interface from your own device to make calls and manage contacts and favorites. |
| Accessibility Feature | Description |
| Touch-capable monitor support | If you have a touch-capable monitor connected to the system, you can select, swipe, and press the screen to perform functions and activate features. |
Sharing Content
Topics:
Share Content Using an HDMI Connection
To enhance the collaboration experience, you can share documents, graphics, and videos with other participants using a computer.
Share Content Using an HDMI Connection
Share content from your device through an HDMI connection. This method doesn’t require you to connect using a wireless service.
Procedure
Connect your device to the video system’s HDMI input port.
Related Links
Use Your System as a Computer Accessory on page 20
- Using Device Mode
Topics
- Computer and Cable Requirements
- Access Device Mode
- Use Your System as a Computer Accessory
- Adjust the System Audio and Camera Settings
- Managing Incoming Calls When in Device Mode
- Exit Device Mode and Disconnect Your Computer
Poly Device Mode enables you to use the system’s camera, speaker, microphone, and connected monitors from your computer.
Once you connect the system to your computer with a USB cable, you can control the video system’s camera and audio features using your computer’s third-party conferencing application. For example, instead of using your computer’s camera for Zoom Rooms calls, connect the Studio X30 and use its 4K camera to automatically follow the conversation in the room. You also gain a Poly echo-cancelling microphone and speaker technology during calls.
Note: Studio X70 doesn’t support Device Mode.
Computer and Cable Requirements
Your computer and cables must meet the following requirements to use Device Mode. Operating system requirements:
- Windows 10 1803 or later
- macOS 10.12 or later
USB cable requirements:
- A cable with at least one USB-C connection for the video system
- USB 2.0 or USB 3.0 cable (preferred to ensure connection reliability and video and audio quality)
- Self-powered USB booster extension cable for connections longer than 2 m (6.6 ft)
Note: Don’t use a cable used for charging devices. A charging cable may not be capable of sending data.
HDMI cable requirements:
An HDMI adapter is required if your computer doesn’t have an HDMI port
Access Device Mode
Use the system touchscreen or a TC8 device to start Device Mode.
Note: Your administrator may configure your system to remain in Device Mode. If your system is already in Device Mode, the system monitor and TC8 device prompt you to connect a USB and HDMI cable to your computer.
Procedure
» Do one of the following:
- From the right border of your screen, swipe left. Select Device Mode .
- When using Zoom Rooms, connect the USB-C cable to the video system and connect the other end of the USB cable to your computer to automatically enter Device Mode.
- The Device Mode screen appears.
Related Links
- Use Your System as a Computer Accessory on page 20
- Use Your System as a Computer Accessory
- To use the video system as an external camera and audio accessory, set your system to Device Mode and connect your Windows or macOS computer with a USB cable.
- If your system isn’t already in Device Mode, access Device Mode. If your conferencing application uses echo cancellation, disable that feature.
- You must use a cable with at least one USB-C connection for your video system. If you use a cable with only one USB-C connection, the USB-C end must connect to your video system for Device Mode to work properly.
Note: Device Mode isn’t available if your system administrator disables the system USB ports. If you need help with Device Mode or connecting a computer to your system, contact your administrator.
Procedure
- Connect a USB-C end of the USB cable to the video system’s USB-C port, and connect the other end of the USB cable to your computer.
- The system monitor and the TC8 device display a confirmation message.
- If you’re using Zoom Rooms, Device Mode automatically starts when you connect the USB cable to your computer. Once you disconnect the USB cable, the system automatically exits Device Mode in 20 to 30 seconds.
- Optional: To display your computer on the video system monitor, connect your computer using the system’s HDMI input port.
Related Links
- Access Device Mode on page 19
- Share Content Using an HDMI Connection on page 18
- Adjust the System Audio and Camera Settings
- In Device Mode, you can mute the system, adjust the volume, and adjust camera settings.
- Access Device Mode and connect your computer to the system.
Procedure
- To mute the microphones, do one of the following:
- In a conference application on your computer, select mute.
- On the TC8 or any connected microphone, select Mute .
- To adjust the volume, do one of the following:
- On the touchscreen or TC8, select Volume and adjust the volume slider.
- Adjust the volume from your computer using the computer or conference application settings.
- To configure camera settings:
- From the right border of the TC8 or the touchscreen, swipe left and select Camera Settings.
- Select Camera Control.
- Turn Camera Tracking on or off.
- Select or set a Preset.
- Press + to zoom in or – to zoom out.
- Press the arrows to tilt up and down or to pan left to right.
Managing Incoming Calls When in Device Mode
If there’s an incoming call, your video system may exit Device Mode. This depends on the partner conferencing application you’re using for the video system.
Exit Device Mode and Disconnect Your Computer
Any camera options you change on the video system with your USB-connected computer revert to their previous settings when you exit
Device Mode.
Procedure
Do one of the following:
- On the video system local interface or TC8 device (if you’ve one), select Exit .
- Unplug the cables connecting your computer and video system. After a short delay, you see the home screen (even if you haven’t selected Exit).
Settings
Topics:
- Cameras
- Audio Adjustments
Before or during calls, you can adjust the system volume. During calls, you can adjust your camera’s position.
Cameras
Depending on the camera type, you can control the following options:
- Adjust near-site (local) camera positions.
- Turn tracking on or off.
Adjust an In-Room Camera
- To enhance the view of meeting participants, make adjustments to the in-room camera.
- If camera tracking is on, camera control is unavailable. Turn tracking off to access camera controls. You can only make camera adjustments during a call.
- With the Studio X50 and Studio X30 systems, you can’t pan or tilt the camera if it’s zoomed all the way out.
Procedure
- From the right border of your screen, swipe left.
- Go to Camera Settings > Camera Controls.
- Press + to zoom in or – to zoom out. Press the arrows to tilt up and down or to pan left to right.
Turn Camera Tracking On or Off
When camera tracking is on, the camera automatically frames the group of people in the room or the current speaker (depending on your camera and how your system is configured).
Procedure
- From the right border of your screen, swipe left.
- Select Camera Settings.
- Select Tracking On or Tracking Off .
Audio Adjustments
You can control several audio settings on the system.
Adjust the Volume
You can adjust the volume before or during a call.
Procedure
Use the volume slider on the device controlling your video system.
Troubleshooting
Topics:
Poly Device Mode
Refer to the following topics to help you diagnose and fix problems while using your system.
Poly Device Mode
Use these topics to troubleshoot problems you may encounter using Device Mode.
Audio Levels are Too High or Low
- In Device Mode, audio from the video system speakers is too loud or it’s difficult to hear call participants.
- In Device Mode, your conferencing application and laptop control the video system’s audio. You may need to adjust those volume controls.
Follow these steps until you get the audio levels you want:
Procedure
- Adjust your conferencing application’s volume.
- Adjust your laptop’s volume.
Conferencing Application Doesn’t Use System Camera or Audio
Your conferencing application isn’t using the video system’s camera or audio in Device Mode. Your conferencing application by default may choose the connected monitor speakers instead of, for example, the Studio X50 speakers.
Procedure
In your conferencing application, select the video system as your speaker, microphone, and camera device.
Can’t Use System’s Camera or Audio
Your conferencing application isn’t using the video system’s camera or audio in Device Mode. There could be a few reasons for these types of problems. For instance, your conferencing application by default may choose the connected monitor speakers instead of, for example, the Studio X50 speakers.
You may notice the following while using Device Mode
- In your laptop’s conferencing application, you can’t select the video system as a camera or audio source.
- The video system’s camera and audio seem unavailable.
- The video system’s camera doesn’t display live video.
Follow these steps until you fix your problem:
Procedure
- In your conferencing application, select the video system as your speaker, microphone, and camera device.
- In your laptop settings, select the video system as your speaker, microphone, and camera device.
- Exit and restart Device Mode.
- Replug the USB cable.
- Connect the cable to a different USB port on your laptop.
- Try using a different USB cable.
- Restart your laptop.
Improve Audio Quality
Audio quality during calls in Device Mode could be better. For example, people on the call notice interference or dropped words when you’re speaking. You may encounter these problems for the following reasons: additional USB connections, a bad cable, or audio processing settings.
Follow these steps until your audio quality improves:
Procedure
- Remove USB audio devices (such as a headset) connected to your laptop.
- Connect your laptop and video system with a different USB cable.
- If your conferencing application uses echo cancellation, disable that feature.
- If you’re playing a musical instrument, enable M-Mode in the system web interface.
Improve Laptop Screen Mirroring
When mirroring your laptop screen with an HDMI connection, the picture on the connected monitor isn’t ideal. The resolution on your laptop may need to be adjusted for the monitor connected to the Poly video system.
Follow these steps until screen mirroring quality improves:
Procedure
- Adjust your laptop’s resolution settings.
- Adjust your laptop’s display settings so the screen duplicates on the monitor.
Poly G7500 Ultra HD Smart Video conferencing camera USER guide
Related Links
- Poly ATA 400 IP Adapter Quick Start Guide
- Poly Planar ME60BT Bluetooth Amplifier User Manual
- Poly Voyager Free 60 Wireless Earbuds User Manual
FAQs
Which video resolution is supported by the G7500?
For incredibly clear video, the G7500 has 4K Ultra HD resolution (3840 x 2160 pixels).
What is the G7500’s field of vision (FOV)?
With its broad 120-degree field of view, the G7500 makes sure that everyone attending a meeting can be seen in the picture.
Is there built-in audio on the G7500?
No, the G7500 has no built-in audio; it is a video camera. It is made to be compatible with external soundbars and other audio equipment, such as the Poly Studio X series.
Are AI-driven features supported by the G7500?
Indeed, it has AI-powered features for a more engaging meeting experience, such as speaker monitoring, participant tracking, and intelligent framing.
Which video conferencing systems can I use with the G7500?
It works with popular video conferencing services like Google Meet, Zoom, Microsoft Teams, and others.